2.1 - Angular
We recommend setting up the project as described in 1 - Installation.
The code described from Steps 1 to 3 (included) is given in the minimal example project you can download here:
> Download our example Angular project
Steps 1 to 3 (included) describe what was done to set up the example Angular project. You can also start a project from scratch using Angular CLI with the following command.
ng new <project-name>To match ScheduleJS dependencies, make sure you use the package.json file provided in 1 - Installation. Otherwise, your project might not compile.
This first part illustrates how to build an application with ScheduleJS and Angular. If you are already familiar with Angular, you can skip this part. Else, you should be up and running in no time.
Step 1 | Angular components
Angular applications are structured around Angular Components. To begin, open your example Angular project with your favorite IDE.
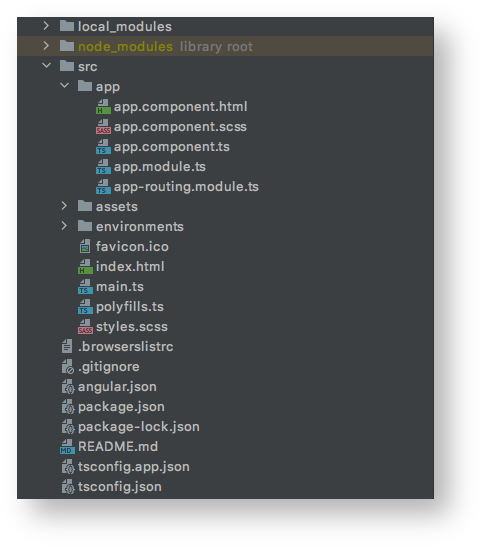
Go to your project folder. Under src/app/, you will find your first component: app.component. This component is the entry point for your application. Here, we will use it to set up a router.
We decided to use the .scss file format for our stylesheets. You can also use the .css, .sass or .less extension. For more information on Angular stylesheets, please check this page.
The router will allow you to navigate between screens in your application. It is optional by default but may become handy in complex applications.
Angular components are composed of 3 files: the Template file (.html), The Stylesheet file (.scss), and The Typescript file (.ts).
The app.component is built with those three files. It will be using two additional files: the Module file that allows component sharing and the Routing file that provides navigation.
Starting point project folder
Step 1.1 | Template: app.component.html
The Template is an HTML file describing the HTML layout and your Angular components as HTML tags.
Here, because we are using the Angular router, the app.component.html file will display nothing but create the <router-outlet></router-outlet> component given by the Angular router, allowing us to navigate the application.
<router-outlet></router-outlet>Step 1.2 | Stylesheet: app.component.scss
The Stylesheet contains style classes that will be applied to your layout. It allows you to style your template in a precise way. You can use multiple CSS conventions like SASS, SCSS, and vanilla CSS... Plus angular CSS selectors like :host, ::ng-deep, etc...
Here, app.component.scss will be used to remove html and body tags default margin and padding and disable the web history navigation (go back/forward) when swiping horizontally.
::ng-deep html body {
  margin: 0;
  padding: 0;
  overscroll-behavior-x: none; // Allow horizontal swipe without triggering navigation
}
Step 1.3 | Typescript: app.component.ts
The typescript file is the main file for building the schedule. It contains the logic, properties, and methods your template will use. It defines how your template will acquire data, react to user input, behave during its lifecycle, and everything related.
Here, the typescript file declares the component's name (selector: app-root) and where its Template and Stylesheet are located. After adding it to the module file, we could use this component in any linked Template using the HTML component notation <app-root></app-root>. As the entry point, though, the app.component is usually only called once; in the main index.html file (.../src/index.html).
import {Component} from "@angular/core";

@Component({
  selector: "app-root",
  templateUrl: "./app.component.html",
  styleUrls: ["./app.component.scss"]
})
export class AppComponent { }
Step 1.4 | Module: app.module.ts
The module file declares which component is available for use in the module. The app.module.ts file is the root of your application, so this module will tell which component will be available to your whole app. Not every component needs a module file, but every component you use must be declared in a module file to be available in your application.
Here, the declarations field contains the components you created and want to share within the module, while the imports field includes libraries and other modules you wish to use. (ex: Angular routing module, ScheduleModule, your custom modules...)
As this module is global, we used this file to declare our ScheduleJS license key in 1 - Installation | Step 5.
import {NgModule} from "@angular/core";
import {BrowserModule} from "@angular/platform-browser";
import {Locale as BaseLocaleEnUs} from "@js-joda/locale/dist/prebuilt/en-us";
import {LicenseManager, Locale, ScheduleModule} from "schedule";

import {AppRoutingModule} from "./app-routing.module";
import {AppComponent} from "./app.component";

@NgModule({
  declarations: [
    AppComponent,
  ],
  imports: [
    // Angular modules
    BrowserModule,
    AppRoutingModule,
    // ScheduleJS module
    ScheduleModule
	// Other modules...
  ],
  providers: [],
  bootstrap: [AppComponent]
})
export class AppModule {

  readonly licenseKey: string = "<Your license key>";

  constructor() {
    Locale.updateDefault(BaseLocaleEnUs.US);
    LicenseManager.setLicenseFromKey(this.licenseKey);
  }

}
Step 1.5 | Routing: app-routing.module.ts
In this demonstration, we are using the Angular router. The routing file is unique and declares which URL renders which component.
The routes: Routes = [] constant will be an Array containing such data. When creating a new route, you must declare both the URL (path attribute) and component (component attribute) to link them together.
import {NgModule} from "@angular/core";
import {RouterModule, Routes} from "@angular/router";

const routes: Routes = []; // Register routes here [{ path: "your-path", component: YourComponent }, ...]

@NgModule({
  imports: [RouterModule.forRoot(routes)],
  exports: [RouterModule]
})
export class AppRoutingModule { }
Now let's create a basic Home page.
Step 2 | Create a home-page component
We will create a basic home page in two steps, containing links to our child components.
Step 2.1 | Create the three files
First, create a folder that will contain the home-page component. Then make the 3 Angular files describing this component.
The home-page component
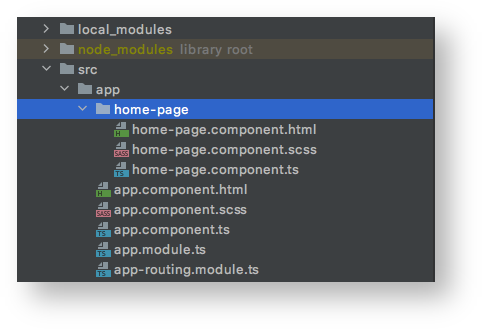
The content for each file is listed below.
Home page
<ul>
  <li>
    <a class="list-item"
       routerLink="/simple-aircraft-gantt">
      Simple Aircraft Gantt
    </a>
  </li>
</ul>.list-item {
color: blue;
}import {Component} from "@angular/core";
@Component({
selector: "app-home-page",
templateUrl: "./home-page.component.html",
styleUrls: ["./home-page.component.scss"]
})
export class HomePageComponent { }
Step 2.2 | Declare the component in the global module and the router
Now, link this newly created component with the rest of the application.
To do so, you have to edit the two module files.
First, add the HomePageComponent exported from the home-page.component.ts file to your app.module.ts file.
import {NgModule} from "@angular/core";
import {BrowserModule} from "@angular/platform-browser";
import {Locale as BaseLocaleEnUs} from "@js-joda/locale/dist/prebuilt/en-us";
import {LicenseManager, Locale, ScheduleModule} from "schedule";

import {AppRoutingModule} from "./app-routing.module";
import {AppComponent} from "./app.component";
import {HomePageComponent} from './home-page/home-page.component';  // Import the component.

@NgModule({
  declarations: [
    AppComponent,
    HomePageComponent  // Declare the component.
  ],
  imports: [
    BrowserModule,
    AppRoutingModule,
    ScheduleModule
  ],
  providers: [],
  bootstrap: [AppComponent]
})
export class AppModule {

  readonly demoLicenseKey: string = "<Your license key goes here>";

  constructor() {
    Locale.updateDefault(BaseLocaleEnUs.US);
    LicenseManager.setLicenseFromKey(this.demoLicenseKey);
  }

}
Finally, create a route to access it. As it is our home page, we want our application's bare URL https://<domain>/ to show the home page. To do so, set its path to "" in app-routing.module.ts.
import {NgModule} from "@angular/core";
import {RouterModule, Routes} from "@angular/router";

import {HomePageComponent} from "./home-page/home-page.component";

const routes: Routes = [
  {path: "", component: HomePageComponent} // https://<domain>/ -> Home page
];

@NgModule({
  imports: [RouterModule.forRoot(routes)],
  exports: [RouterModule]
})
export class AppRoutingModule { }
Step 3 | Create a component for the ScheduleJS component
The last step is to create a component where you will display your ScheduleJS component.
We will create a new route to host this component on a specific URL.
Step 3.1 | Create the three files
First, create a new folder that will host the component and make the three base Angular files. Here we will name this new component "simple-aircraft-gantt".
The folder ends up looking like this
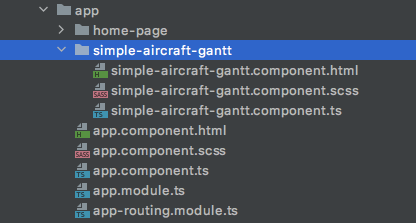
The content of the files is listed below
<div>Welcome to simple-aircraft-gantt component!</div>/* Empty */import {Component} from "@angular/core";
@Component({
selector: "app-simple-aircraft-gantt",
templateUrl: "./simple-aircraft-gantt.component.html",
styleUrls: ["./simple-aircraft-gantt.component.scss"]
})
export class SimpleAircraftGanttComponent { }
Step 3.2 | Declare the component in the global module and the router
To link this new component with the rest of the application, you must edit the two module files again.
This step allows you to create an URL to this component using the router and refer to it as <app-simple-aircraft-gantt> in any other component by simply importing it into a module.
To do so, add the SimpleAircraftGanttComponent exported from the simple-aircraft-gantt.component.ts file to your app.module.ts file.
import {NgModule} from "@angular/core";
import {BrowserModule} from "@angular/platform-browser";
import {Locale as BaseLocaleEnUs} from "@js-joda/locale/dist/prebuilt/en-us";
import {LicenseManager, Locale, ScheduleModule} from "schedule";

import {AppRoutingModule} from "./app-routing.module";
import {AppComponent} from "./app.component";
import {SimpleAircraftGanttComponent} from "./simple-aircraft-gantt/simple-aircraft-gantt.component"; // Import the component.
import {HomePageComponent} from './home-page/home-page.component';

@NgModule({
  declarations: [
    AppComponent,
    SimpleAircraftGanttComponent, // Declare the component.
    HomePageComponent
  ],
  imports: [
    BrowserModule,
    AppRoutingModule,
    ScheduleModule
  ],
  providers: [],
  bootstrap: [AppComponent]
})
export class AppModule {

  readonly demoLicenseKey: string = "<Your license key goes here>";

  constructor() {
    Locale.updateDefault(BaseLocaleEnUs.US);
    LicenseManager.setLicenseFromKey(this.demoLicenseKey);
  }

}
Finally, create a route to host it separately. Here, we will be using the specific URL: https://<domain>/simple-aircraft-gantt/.
To do so, map the path "simple-aircraft-gantt" with this component in app-routing.module.ts.
import {NgModule} from "@angular/core";
import {RouterModule, Routes} from "@angular/router";

import {HomePageComponent} from "./home-page/home-page.component";
import {SimpleAircraftGanttComponent} from "./simple-aircraft-gantt/simple-aircraft-gantt.component";

const routes: Routes = [
  {path: "simple-aircraft-gantt", component: SimpleAircraftGanttComponent}, // https://<domain>/simple-aircraft-gantt -> Component
  {path: "", component: HomePageComponent}
];

@NgModule({
  imports: [RouterModule.forRoot(routes)],
  exports: [RouterModule]
})
export class AppRoutingModule { }
Step 4 | Start the application
With those 2 components you now have a home page containing a link to a Angular Component that will be used for building your first schedule, using ScheduleJS.
To start the application, open a terminal in your project folder and run the following command:
yarn startNote: If you decided to use npm, use 'npm start' instead.
Your project is now up and running. Navigating to localhost:4200 (Angular default port) with a web browser should show:
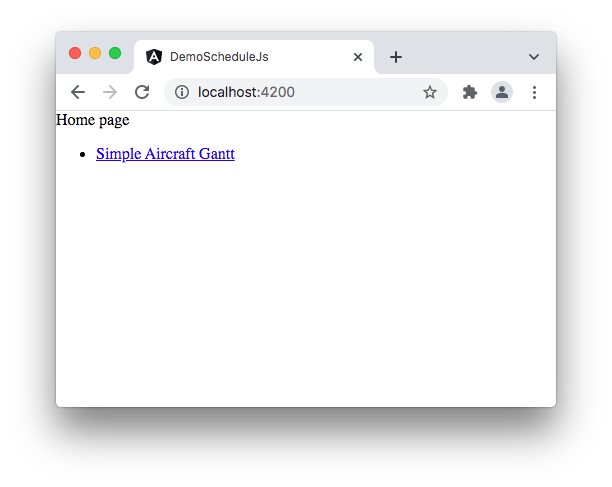
And when clicking on Simple Aircraft Gantt:

Angular development mode enables any change that you do to the code to refresh this web page.
Well done! You now have the Angular basics. The next step is to edit this component to create your first Gantt chart using ScheduleJS in 2.2 - Simple Aircraft Gantt